1. Masuk/login ke facebook.com
2. Kunjungi url ini: developers.facebook.com/setup
3. Isi kotak yang tersedia sbb: Lihat gambar dibawah ini

Isikan App Display Name sesuai ke ingginan, kosongkan saja App Namespacenya, dan centang pada Agreement lalu continue.
4. Klik Continue/Lanjutkan. kemudian muncul window verifikasi kata dan isikan kata yang telah diberikan.
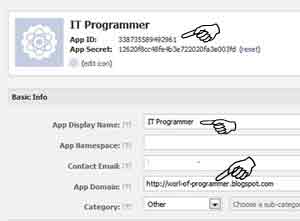
5. Setelah itu muncul window baru berupa App ID, Lihat gambar dibawah ini:

"App id" adalah nomor aplikasi id fb Anda. Catat dan simpan nomor App id
tersebut di notepad atau ms.word. ini akan diperlukan nantinya.
Alamat blog/situs harus ditambahkan ke aplikasi yang dibuat. Tanpa itu,
akan muncul warning di kotak komentar blog seperti "Warning: the url ---
is Unreachable". Berikut cara menambah alamat blog:
- Masuk/login ke aplikasi Anda yang tadi dibuat. Atau kunjungi link ini: https://developers.facebook.com/apps/nomor-app-id-anda/ (ganti nomor-app-id-anda dengan nomor aplikasi Anda).
- Klik Edit Settings (kanan atas)
- Pada "Select how your app integrates with Facebook" -> klik Website (paling atas)
- 4. Masukkan alamat url blog anda. Contoh, http://super-bee.blogspot.com/ (jangan lupa diakhiri dengan garis miring).
- Klik Save Changes
Jika muncul popup fb HTML, huraukan saja karena saya sudah mempersiapkannya untuk Anda.
Kembali ke Blog Anda :
1. Masuk/login ke blogger.com -> Template -> Edit HTML -> Lanjutkan -> tanda tik pada Expand Widget Template
2.Cari kode seperti dibawh ini : (tekan ctrl+f) "kode dibawah biasa berada paling atas"
<html b:version='2' class='v2' expr:dir='data:blog.languageDirection' xmlns='http://www.w3.org/1999/xhtml' xmlns:b='http://www.google.com/2005/gml/b' xmlns:data='http://www.google.com/2005/gml/data' xmlns:expr='http://www.google.com/2005/gml/expr' xmlns:fb='http://www.facebook.com/2008/fbml'>
dan masukkan kode dibawah ini : (lihat kode diatas)
xmlns:fb='http://www.facebook.com/2008/fbml'
3. Kemudian cari kode </head> ,dan letakkan kode berikut ini diatasnya
<b:if cond='data:blog.pageType == "item"'><meta expr:content='data:blog.pageTitle' property='og:title'/><meta expr:content='data:blog.url' property='og:url'/><b:else/><meta expr:content='data:blog.title' property='og:title'/><meta expr:content='data:blog.homepageUrl' property='og:url'/></b:if><meta content='NAMA BLOG ANDA' property='og:site_name'/><meta content='App ID' property='fb:app_id'/><meta content='ID Profil Anda' property='fb:admins'/><meta content='article' property='og:type'/>
PENTING: Lihat tulisan yang berwana merah...
a. Ganti tulisan NAMA BLOG ANDA sesuai nama blog/situs anda.
b. Ganti tulisan APP ID ANDA dengan nomor aplikasi id Anda yang di save ke notpad tadi.
c. Ganti ID PROFIL FB dg yang sesuai. Contoh : https://www.facebook.com/profil/100000149724303
4. Cari kode </head> seperti no 3 tadi dan letakkan kode berikut ini tepat dibawah kode </head>
<div id='fb-root'/>
<script>
window.fbAsyncInit = function() {
FB.init({
appId : 'App ID Anda',
status : true, // check login status
cookie : true, // enable cookies to allow the server to access the session
xfbml : true // parse XFBML
});
};
(function() {
var e = document.createElement('script');
e.src = document.location.protocol + '//connect.facebook.net/en_US/all.js';
e.async = true;
document.getElementById('fb-root').appendChild(e);
}());
</script>
Ganti tulisan merah dengan App ID Anda yang telah Anda simpan kedalam notepad tadi.
5. Cari kode seperti dibawah ini :
<a class='timestamp-link' expr:href='data:post.url' rel='bookmark' title='permanent link'><abbr class='published' expr:title='data:post.timestampISO8601'><data:post.timestamp/></abbr></a>
</b:if>
</b:if>
6. Tambahkan kode dibawah ini tepat dibawahnya :
<b:if cond='data:blog.pageType == "item"'>
<div class='fb-comments' data-num-posts='2' data-width='450' expr:data-href='data:post.url'/>
</b:if>
Contoh : Lihat dibawah ini..
title='permanent link'><abbr class='published' expr:title='data:post.timestampISO8601'><data:post.timestamp/></abbr></a>
</b:if>
</b:if>
<b:if cond='data:blog.pageType == "item"'>
<div class='fb-comments' data-num-posts='2' data-width='450' expr:data-href='data:post.url'/>
</b:if>
7. Save Template Anda.
Tidak ada komentar:
Posting Komentar